


|
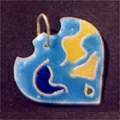
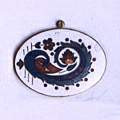
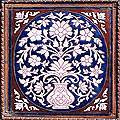
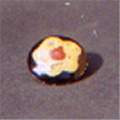
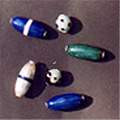
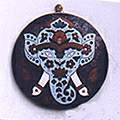
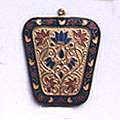
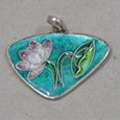
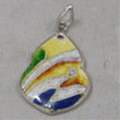
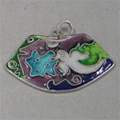
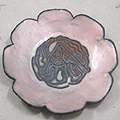
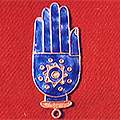
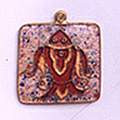
INTRODUCTION In the past, enamelling was practised in many centres in India, with each region specialising in its own particular style and technique. In Lucknow, the minakars specialised in blue and green enamelling on silver, while in Banaras the dusky rose-pink or the gulabi mina was the dominant colour. The craft was also practised in Kangra, Kashmir, and Bhawalpur. It was, however, extremely vibrant in Jaipur (Rajasthan) and in Delhi, and these two centres continue to create exquisite pieces of minakari work till today. It was only after the introduction of the Gold Control Act in India – which compelled the minakars to look for a base material other than gold – that copper was introduced. Copper is now used as base material for enamelling in a range of handicraft products, including plates, ashtrays, and decorative mirrors. ABOUT ENAMELS Enamels can also be classified according to the properties of the colours. Included are,
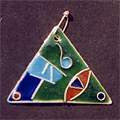
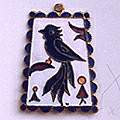
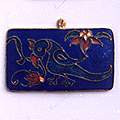
In India, enamel is available in vitreous and industrial form. Industrial enamel comes in all colours but is usually opaque and is commonly used for hospital and industrial equipment, and pots and pans. It is also cheaper. Vitreous colours are both opaque and transparent. PRINCIPAL ENAMELLING TECHNIQUES CHAMPLEVة: In this, portions of the surface of the metal are cut away, creating troughs and hollows, separated by raised lines of metal that form the outline of the design. The hollows are then filled in with colours. CLOISONNE: In this, thin strips or wires of copper are soldered/fastened on to the base metal in order to produce a closed cell (cloison) design. These cells are then filled with enamel colours and fired. Each colour stays within the enclosed cell and does not diffuse to other spaces. Once the piece is completed, the cloisons are only visible as a fine network within the enamel. PLIQUE A JOUR: In this, metal strips or individual wires are used to create the design, and are often used to create the structure of the object itself, such as a vessel or a piece of jewellery. These wires or strips are soldered to each other, rather than to a base metal, thus creating a network of metal for the enamellist to work upon. Here the enamel does not have a backing but is held together by the metal structure. The final results are stunning. ENAMELLING ON COPPER: A STEP BY STEP PROCESS A word of caution – if you are doing enamelling for the first time it is suggested you do a short orientation course with a trained enamellist. The Enamelist Society, among others, runs courses for beginners in both Delhi and Mumbai. In copper enamelling, as in jewellery, a powdered coloured glass called enamel is applied to the copper base. The whole piece is then subjected to high levels of heat and as the glass enamel melts, its thermal expansion matches the expansion of copper, allowing it not only to fuse to the metal, but also to remain firmly attached to it when it cools down again. MATERIALS REQUIRED
You will need the following in your work space
NEVER FORGET….
STORAGE OF ENAMELS Colours should be stored in tight containers to protect from dust and oxidation, preferably of glass or plastic. APPLICATION METHODS |
|

|
DUSTING: Dry colours can be dusted through sieves onto the base metal. Usually a gum and water solution is applied on the base so that the dry colours do not blow away. Enamels are available in forms other than just powders. Colour sticks, threads, and little chunks or crystals of colour, for example, are often popular and can sometimes be placed on the base to give a different effect. WET CHARGING: Wet colours are those that can be mixed with water and a small amount of gum and applied with regular sable brushes. Ceramic oils and glycerine can also be used as a mixer. |
|
FIRING OF ENAMELS DISPOSAL OF MATERIALS |
|
STEP BY STEP PROCESS
| 1. |  |
Remove all surface impurities from the copper piece (20-22 gauge thickness) by putting the copper piece into a preheated kiln. Use tongs for handling the piece. |
| 2. |  |
Leave the piece in the kiln for a minute or two so that the impurities are burnt out. This process is called annealing. |
| 3. |  |
Remove the copper piece from the kiln and put into a water bath to cool the piece and remove the burnt ash-residue that you will find on the surface of the piece.. |
| 4. |  |
Take out the copper piece from the water, using tongs, and dip it into a solution of sulphuric acid and water made in a ratio of 1:7. |
| 5. |  |
Leave the copper piece for a few minutes in this solution. This helps remove the remaining grease and impurities from the copper piece. |
| 6. |  |
Remove the piece from the sulphuric acid solution, using tongs, and dip into the water bath again, ensuring that the acid solution does not drip anywhere. A word of caution – remember the acid solution is strong and can burn you. |
| 7. |  |
Scrub the piece well on both sides with a brush. Use vim if necessary. The copper piece should glisten. |
| 8. |  |
Do not handle the piece directly with bare hands – instead hold the piece from the sides – the fingers or thumb should not rest on the surface of the piece, even accidentally, as this leaves residue oil on the copper piece and affects the enamelling. |
| 9. |  |
Wash well in running water removing all traces of the cleaning agent used as well as the surface grease and all other impurities. |
| 10. |  |
The copper piece should glisten. |
| 11. |  |
Next, a ground coat of wet enamel is applied to one side of the copper piece. The enamel solution should be slightly watery and can be dabbed on with a brush. |
| 12. |  |
Cover the full piece properly and allow the enamel to dry completely. Wipe off all extra enamel that may have gone to the other side. |
| 13. |  |
Fire in a preheated kiln for 1-11/2 minutes. Firing the ground coat at 830 degrees celsius envelopes the metal in glass. This process is known as counter enamelling. |
| 14. |  |
If the enamel continues to be grainy it usually means it is under fired and needs to be further fired. If the piece is warped then immediately put it under a weight – it will straighten out. Alternatively drop it on the floor and stamp on it. |
| 15. |  |
Counter enamelling is done so that the tension of the piece is the same on both sides of the metal and will eventually ensure that the metal does not warp or the enamel crack over time. The metal and the enamel expand and contract at different rates when heated, counter enamelling to some extent takes care of this. |
| 16. |  |
Cover the second side with the opaque enamel solution of the colour that you want. |
| 17. |  |
Cover the piece completely. |
| 18. |  |
After ensuring that the entire side is covered with the enamel solution, knock the piece on the side with any hard object like a pencil. This ensures that the enamel solution spreads uniformly. |
| 19. |  |
Allow the enamel to dry. Now you could scratch a design on the dried coloured enamel solution, using a sharp well pointed pen or marker. The line impressions should be deep enough to expose the copper base. |
| 20. |  |
Fire for 1-2 minutes. |
| 21. |  |
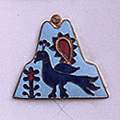
The firing burns the exposed copper lines and turns them black, while at the same time melting and fusing the remaining enamel to the base. This is technique is known as sgraphito. |
| 22. |  |
If required excess enamel can be removed using a stone file. |
| 23. |  |
The copper piece can be further worked upon by applying colour in various ways. In this case wet enamel with a paint brush. |
| 24. | |
Another way is to cut a stencil in an desired pattern and dust the colour over it. To ensure that the colour does not blow away the piece is first sprayed with a solution of tarragon gum and water. The colour then settles on the exposed piece. |
| 25. |  |
The stencil is lifted from the copper piece and the piece fired after drying. |

Access 70,000+ practitioners in 2500+ crafts across India.

10,000+ listings on arts, crafts, design, heritage, culture etc.

Rich and often unfamiliar vocabulary of crafts and textiles.

Needs to be written.